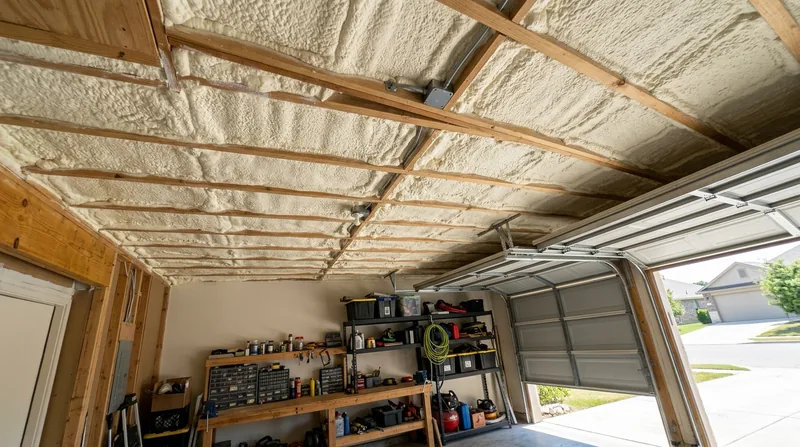




Austin summers push garage temperatures above 140 degrees, turning a storage space into an oven and bleeding heat into bonus rooms above. Garage spray foam insulation seals the ceiling and shared walls against that radiant afternoon load, transforming a sweat box into usable workshop, gym, or office space. West of MoPac, Westlake and Lakeway homeowners face the same problem on a larger scale. On the east side, Round Rock and Cedar Park slab-built two-stories with bonus rooms over garages lose comfort and efficiency the moment the garage stays unsealed. The limestone hills and open prairie of Greater Austin mean no basement, no cool underground refuge, and every square foot of conditioned space matters when the grid peaks in July and August. Garage insulation is not decoration; it is the difference between a storage oven and a room you can actually use.
Why Garage Spray Foam Insulation Matters in the Austin Heat
An uninsulated garage ceiling acts as a radiant barrier that fails in both directions. Heat from the roof transfers down into the space below, and conditioned air from the bonus room above leaks down through the ceiling cavity. Spray foam stops both pathways by sealing the cavity completely and creating a thermal break between the garage and the living space. This is not about perfect comfort in a storage area; it is about protecting the efficiency of the rooms above and making the garage itself usable for work or recreation during the brutal Central Texas summer.
- Stops radiant heat transfer from the roof deck into the garage space, lowering daytime temperatures by 15 to 25 degrees.
- Seals air leaks around the shared wall and ceiling penetrations that allow conditioned air to escape into an unconditioned zone.
- Protects the bonus room or second-story living space from losing cooling efficiency through floor cavities and rim joists.
- Eliminates condensation on metal ductwork and water lines that run through uninsulated garage ceilings during morning cool-down.
- Handles workshop conversions, home gyms, and artist studios without the need for separate HVAC runs.
Once the foam is in place, the garage becomes part of the thermal envelope instead of a liability.
Key info: A Brentwood homeowner with a bonus room over a two-car garage saw a 12-degree drop in the upstairs bedroom after sealing the ceiling cavity with closed-cell foam. The room went from unusable during summer to usable year-round, and the HVAC system no longer fights a losing battle against heat bleeding down from the roof.
For more context on how foam sealing protects your whole home, see our air sealing service page.
How We Seal Your Garage Ceiling and Walls
The job starts with a visual inspection of the garage ceiling, the shared wall cavity, and any rim joist or band joist areas where the garage frame meets the house structure. We identify all penetrations, electrical boxes, and ductwork that will affect spray pattern and thickness. We then choose between closed-cell and open-cell foam based on the presence of moisture risk, the need for vapor control, and your budget. Closed-cell foam is the standard for garage work because it handles the heat load, provides vapor control, and reaches R-value quickly. Open-cell is lighter and less expensive if vapor management is already in place, but closed-cell is the safer bet in Austin's hot climate.
- We set up mechanical ventilation to control fumes and ensure safe air quality during the spray and cure window.
- We spray the ceiling cavity in controlled passes, building thickness in layers to meet your R-value target without overshooting and wasting material.
- We seal rim joists and any shared wall cavities that connect the garage to the conditioned space above or beside it.
- We trim excess foam flush with the framing and install the thermal barrier required by code, typically a fire-rated drywall or intumescent coating.
- We establish a re-entry window of 24 to 48 hours before the space is safe for occupancy and normal use.
The result is a sealed, thermally isolated garage that no longer bleeds energy or humidity into your living space.
Real example: A Cedar Park homeowner converted a two-car garage into a home office and workshop. The ceiling and the wall shared with the kitchen were sealed with 2 inches of closed-cell foam, achieving R-12 on the ceiling and R-7 on the wall. The office stayed usable even during the 100-degree days of June and July, and the kitchen no longer felt the afternoon heat radiating down from above.
For details on the foam types and their applications, see our closed-cell spray foam page.
Garage Insulation Methods: Closed-Cell vs. Open-Cell
| Approach | Description | Best for |
|---|---|---|
| Closed-Cell Spray Foam | Dense, rigid foam that cures in minutes. Reaches R-6 to R-7 per inch. Stops air and vapor movement. Adds structural strength to the cavity. | Garage ceilings and shared walls in hot climates. Any space where moisture control and thermal performance are both required. |
| Open-Cell Spray Foam | Softer, less dense foam that cures in hours. Reaches R-3.5 to R-3.8 per inch. Allows vapor diffusion. Lower material cost and less weight. | Garage ceilings where vapor is not a concern and budget is the primary constraint. Sound dampening in workshop spaces. |
| Closed-Cell + Drywall Finish | Closed-cell foam with fire-rated drywall or intumescent coating applied over the surface to meet thermal barrier code requirements. | Finished garage interiors, bonus rooms, and any space where the foam will be exposed to occupants or the code demands a fifteen-minute thermal barrier. |
| Rim Joist and Band Joist Sealing | Closed-cell foam applied to the perimeter where the garage frame meets the house structure, sealing the cavity and any rim board penetrations. | Garages on pier-and-beam or slab-on-grade where the rim joist connects to the house and needs air sealing and thermal isolation. |
Each method is chosen based on the garage layout, the adjacent conditioned space, and code requirements at your address. We write the R-value and thickness into every estimate so you know exactly what you are getting.
Garage Spray Foam Insulation Cost in Austin: What to Expect
Garage insulation in the Austin area starts at $1,200 for a standard two-car ceiling with 2 inches of closed-cell foam and basic drywall finish. The actual cost depends on the size of the garage, the R-value target, the type of foam, whether the shared wall needs sealing, and the condition of the ceiling cavity. A single-car garage with a lower R-value will cost less; a three-car garage with a shared wall and rim joist sealing will cost more. Access to the space, the presence of ductwork or plumbing that needs careful navigation, and the need for a thermal barrier finish all move the price upward.
We always start with a free, no-obligation estimate that includes the specific R-value, thickness in inches, and the foam type we recommend for your situation. This is not a phone quote; it is an on-site walk-through so we can see the cavity, measure the square footage, and give you a number that reflects your actual job. Two to three estimates from different contractors will show you the range and help you understand what drives the cost in your neighborhood.
For a full breakdown of pricing across all our services, visit our pricing page.
What to Look for When Hiring a Spray Foam Insulation Contractor Near Austin
Finding the right contractor for garage insulation means looking beyond the phone quote. A reputable spray foam installer will provide a written estimate with R-value and thickness clearly stated, will explain the foam type and why it is the right choice for your space, and will walk you through the cure time and re-entry window before work begins. The contractor should be fully insured and able to verify coverage. They should also be transparent about what permits apply at your address and whether your city requires contractor registration before work starts. Contractor registration varies from Austin to Round Rock to Cedar Park and beyond, and there is no reciprocity between cities, so always ask the contractor for their local registration and confirm it with your city before signing anything.
- Request a written estimate with R-value per inch, total thickness in inches, the foam type, and the cost broken down by material and labor.
- Ask about mechanical ventilation during the spray and cure process; if a contractor promises immediate re-entry, that is a red flag.
- Verify that the contractor is fully insured and ask for a certificate of insurance naming you as additional insured during the work.
- Check references from recent jobs in your area, specifically asking about the quality of the thermal barrier finish and whether the space stayed usable during the cure window.
- Confirm what permits your city requires and whether the contractor will help you navigate the process or pull permits on your behalf.
- Ask about the workmanship warranty and what it covers; honest contractors offer one to three years on the installation, not a lifetime guarantee.
A local contractor with a local address and local plates, who takes time to understand your space and your goals, will deliver better results than a rig-and-run outfit or a national franchise that treats every garage the same way.
Ready to move forward? Contact us for a free estimate or call (737) 404-4885.
Garage Spray Foam Insulation in Austin: Pricing Guide
| Service | Price | Details |
|---|---|---|
| Single-car garage ceiling | Starting at $1,200 | Closed-cell foam, 2 inches, R-12 to R-14, basic thermal barrier included |
| Two-car garage ceiling with shared wall | Starting at $1,800 | Ceiling plus shared wall sealing, closed-cell foam, drywall or intumescent finish |
| Three-car garage or large workshop conversion | Starting at $2,400 | Full ceiling, shared walls, rim joist sealing, high R-value target, finished thermal barrier |
| Rim joist and band joist sealing only | Starting at $600 | Garage perimeter air sealing where frame meets house, closed-cell foam, no ceiling work |
| Travel and estimate | Included in Austin area | No separate mileage fee or call-out charge for estimates within our service zone |
| Free written estimate | No obligation | R-value, thickness, foam type, and cost breakdown provided on site within 24 hours |
Indicative pricing, the exact cost depends on square footage, finish, and site access. Free personalized estimate within 24h at (737) 404-4885.


